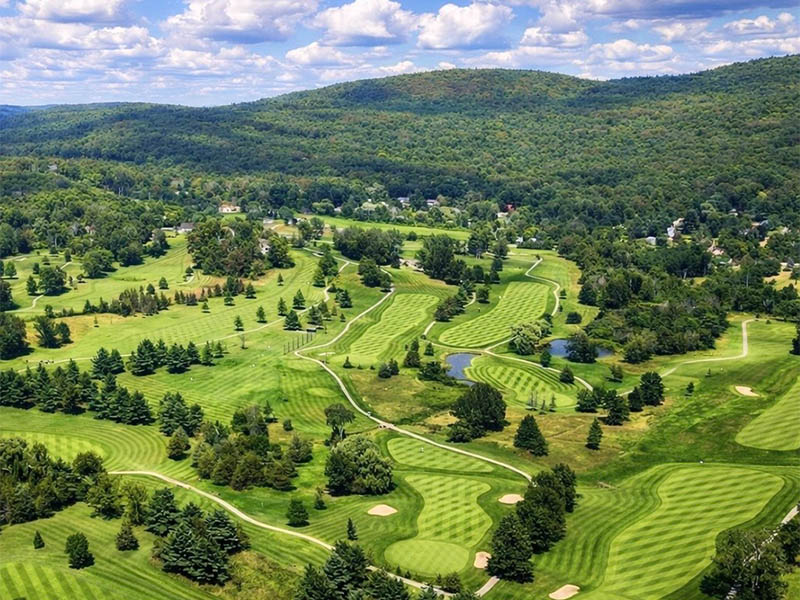
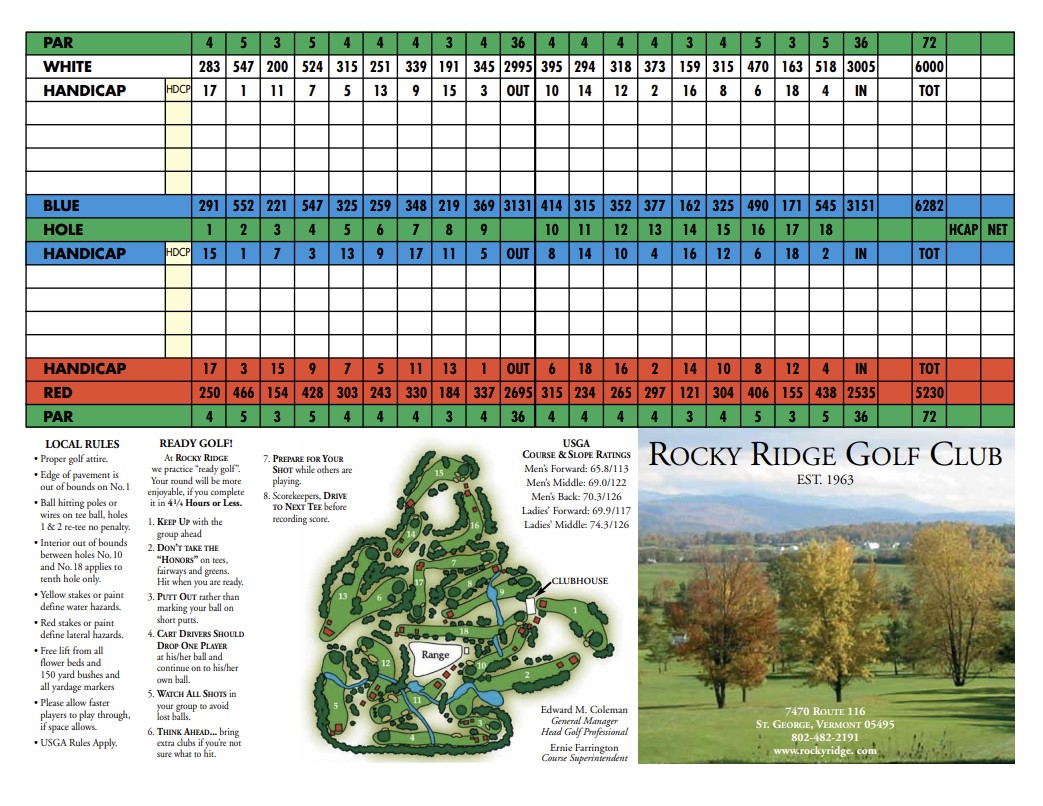
Course

See the beauty of Vermont golfing

course-layout
Challenge yourself on our scenic 18-hole course with unique terrain and multiple teeing areas to suit players of all abilities, or hone your skills on our practice greens and driving range. Rocky offers an outstanding environment for beginners and experts alike.

Please view our Hole by Hole Course Review

Vital statistics

  • Opened: 1963
  • Designed by: Ernie Farrington
  • Length: 6,000 yards (white tees)
  • Par: 72
Please download our scorecard (PDF file)

Open Dawn to Dusk, tee times are always available 7 days a week, with Midweek and Twilight specials. Phone 802.482.2191
or 877.653.2133 (Toll Free) to book during busy periods.

Club rentals are available as well as instruction. Single, spousal, young adult and junior memberships are available.

Hole #1

Description:

A short par four hole looking out to the east at Mount Pritchard, a gorgeous site in the fall. It is a slight dogleg right, reachable with a long drive, but the road on your left (OB) and tall trees on the right all threaten bogey land.

Hazards:

Two traps not seen from the tee, guard the right front of the green. By the way do not go over the back of the green; i.e. more trouble.

Yardage

1st hole tee box
1st hole green

Hole #2

Description:

A full par five, requires a drive down the right center, essentially at the white pump house in the distance. Most golfers will also want to hit their second shot at the pump house being careful not to hit too far. This will keep you short of the small stream and pond, and position your third shot to the right of the willows for easy access onto the green. Long hitters, going for the green in two will need to hit over the willows and beware of the close proximity of the pond to the right of the green.

Hazards:

Apart from the pond, stream and willows, the green of this #1 handicap hole is deceptively contoured. Take time to make a good read.

Yardage

image of tee
image of hole

Hole #3

Description:

A straightforward par three. Like most of our greens it slopes back to front. The sand trap on the right front catches lots of traffic. And don’t expect a lively (hot) run-up to green; it is usually somewhat soft.

Hazards:

What you see is what you get. Second shots from back of the green are hard to stop by the hole.

Yardage

image of tee
image of hole

Hole #4

Description:

A straightaway; par five covering 500 yards (and more) to the green. It’s a piece of cake if you play down the middle and don’t lose a stroke to the tiny brook (water hazard) running through the fairway some 220 yards from the green. Two good woods should yield a short shot to a somewhat uphill green.

Hazards:

You have a large shallow sand bunker on the right of the fairway at around 210 yards from the white tees. There is a bunker to the right of the green but it seldom comes into play.

Yardage

image of tee
image of hole

Hole #5

Description:

Another par four, offers an opportunity for the “Tiger-like” players to go for the green at 325 yards. However the landing area is rather narrow beyond the brook about 95 yards from the center of the green. Most players will lay-up, hitting right center in the fairway to settle in close to the 150 yd. marker, well above the slope down to the brook.

Hazards:

Another steep back-to-front green, suggests you stay below the hole and do stay out of the brook.

Yardage

image of tee
image of hole

Hole #6

Description:

Deceptively tough. It is a short par four that absolutely demands straight shooting. We suggest hitting your most comfortable long iron or lofted wood getting cozy with that red and white 100 yd. marker in the middle of the fairway. The green is small and well protected by trees to the left and a steep drop off to the right and right rear. A very solid short iron to the green puts the player in good shape for a birdie, but many good rounds have been torpedoed on this hole.

Hazards:

No bunkers, no water, but ” trouble” is all around you. Even the cart path may pose a problem near the green. Take dead aim and swing smooth. If not take time to smell the flowers, you will be getting some nice views as you move on to the next tee.

Yardage

image of tee
image of hole

Hole #7

Description:

Hitting from an elevated tee, is pretty much wide open. At par four, it is our second easiest hole unless you duck hook to the trees on your left. Just favor the right center of the fairway and swing away. You may want to aim those second shots to the green just slightly to the left of pin.

Hazards:

The large shallow trap on the left of the green is visible to all, but the small deeper trap on the right is hidden, and will catch some unexpected second shots.

Yardage

image of tee
image of hole

Hole #8

Description:

Another par three, is a good test being uphill and the better part of 200 yards, off the white tees. It has a strong back to front contour. Aim slightly right of the pin.

Hazards:

You have no bunkers but being off the back and to the left of green requires a delicate second to get near the hole.

Yardage

image of tee
image of hole

Hole #9

Description:

The fifth par four hole on the front nine. It is our #3 handicap hole largely because of the difficulty of handling the pond in the left center of the fairway. If your drives consistently carry 225 yds.,you will find a broad landing area beyond the pond. For those who choose to lay-up, you will need to hit just short of the pond around 190 yards (from white tee) and be ready to hit a big uphill second shot, some 170 yd. out. We have out of bounds on the left and a hit-a-provisional-ball forest on the right.

Hazards:

Did I mention a strong back to front green and a tough return shot if you hit over the green.

Yardage

image of tee
image of hole

Hole #10

Description:

Hole 10 provides a beautiful view over the valley and the 10th and 18th holes. It is a par four dogleg right and most players from the white and blue tees will be able to take a shortcut hitting over the tallest trees to the right of fairway. Hit at the tallest mountain over the trees and you will be set up nicely for your second shot. Hit your drive straight away, left of the trees on the right and you are looking at a mighty long second shot.

Hazards:

We have out-of-bounds on the right (white stakes) which lineup close to the cart path on the 18th fairway. There is also a drainage ditch (water hazard) to the right of the fairway 125 yards to the green. Note that there is a free drop area for continuing with balls hit in to the driving range.

Yardage

image of tee
image of hole

Hole #11

Description:

One of the easiest par fours on the course, particularly so since we lost the giant tree that framed the right side of this slight dogleg. That said, the opportunity is there to put one in the trickling brook, about 95 yd. from the green. Or you could hit long (over the green) into the arbor vitae that protect the backside. A miss hit drive may catch the bigger stream (and pond) that is situated about 100 yards off the white tee. Otherwise, this is one of the best birdie holes. Take advantage of it!

Hazards:

Fairway bunkers protect left and right side of fairway.

Yardage

image of tee
image of hole

Hole #12

Description:

Another opportunity for the Tiger-types to go for the green. To reach this dogleg left you will need around 280 yards in flight some luck (bunker and trees) and some roll. Be absolutely sure the green is clear before attempting this. Otherwise keep it right of the Willows and over the brook and you will be fine. Aiming at the red-and-white 100 yd. marker is pretty safe.

Hazards:

The brook below the hill is around 150 yards out from the green. Beware of the bunker to the left of the green and note that it is better to be a bit short than to be long. The run-up to the green tends to be a bit hard, promoting big bounces and balls that run off the back.

Yardage

image of tee
image of hole

Hole #13

Description:

A hole that is long remembered by those who have played Rocky Ridge. Aim your drive to the right of center on this straight away uphill par four scenic hole. In mid summer the balls tend to move right to left once on the ground. You want to stay to the right of the big pine tree, which guards the left side of the fairway on your second shot. Reaching the terraced green in two requires a very accurate shot and stepping down about two clubs to get required distance. Most double-digit handicap players look at this, our # 2 handicap hole, as a par five and play to the high valley hoping to chip close for a regular par. The narrow valley is lined with trees on the right and left.

Hazards:

The problems of this hole are visible until you get to the green, which is rather small and is sharply terraced. Enjoy the view if nothing else works. Many consider this our hardest hole.

Yardage

image of tee
image of hole

Hole #14

Description:

The shortest of the par three holes at about 160 yards from the white sand blues. It is all uphill and much tighter than it first appears. The trees and large outcrop exposures to your left are big trouble to be avoided. On the right the lay of the land falls off sharply and the front of the green will probably not hold a high shot. It is safe to say you need to aim a little left of the pin but watch for giant deflections of your ball if you hit left of the green. This scenic ridge provided the golf course name, “Rocky Ridge”.

Hazards:

The back of the green hides a large sand bunker. Enjoy the view and pick some fresh Mulberries if you catch the sand.

Yardage

image of tee
image of hole

Hole #15

Description:

The tee stands high above the valley allowing a grand view of Brownell Mountain to the north and the green far below over 300 yards away. To the west you may peek through the shrubs, on your left of the tee, and see the Adirondacks. This is an easy hole provided you hit reasonably straight and get well beyond the trees on the slope. Big hitters must wait for foursomes ahead to clear the green while those more modest ball strikers should wait until all are on the green before hitting drives. As you look below you from the tee there is one extra large tree that seems to lead to the middle of the fairway. Hit over it, or hit slightly to the right of the tree!

Hazards:

The field to the left of the hole is out of bounds. The green is well-protected on the right with sand traps that you would not see from the tee. If you should need to approach the green from behind the traps take note that front left part drops off more than it would seem to the casual observer. Aim a bit to the right of the pin.

Yardage

image of tee
image of hole

Hole #16

Description:

A shortish dogleg right par 5 that requires a strong straight drive to the hole’s corner. From there, it is straight away up a slight incline to the green. Honestly one of the easier pars on the course if you remain trouble free.

Hazards:

The tee ball that is faded will catch a grassy hillside to the right, that can result in lost balls. The green is guarded by a left side bunker. A shot that misses long or left will result in a very difficult pitch.

Yardage

image of tee
image of hole

Hole #17

Description:

A short par three played from an elevated tee is our signature hole. The distant mountain in view directly over the green is Mt. Glen Ellen. The local advisors say aim just a hair left of the pin, as the ball tends to move right to left on the ground. The truth is that balls hit left or right of the green are in much bigger trouble than those hit short of the green.

Hazards:

There is a good size trap to the left of the green that coupled with low hanging branches may make for challenging shots for drives which miss left.

Yardage

image of tee
image of hole

Hole #18

Description:

A grand finishing par five hole. The fairway is rather broad thus you may want to crank a long one. There are no fairway bunkers and should your drive stray right you have a free lift from the driving range. A good second shot will leave most of our golfers at the bottom of the hill leading to the final green. You will want to drop down at least one club (maybe two) of lower loft to get up this hill. Once on the green the fun begins. It slopes from back to front and the lower half is rarely used for pin placement.

Hazards:

We strongly suggest you approach the green avoiding shots that might leave you with down hill chips or putts. Historically, a lot of matches have shifted unexpectedly with someone taking three (even four) shots to get down from the upper fringe of the green.

Yardage

image of tee
image of hole
All content © 2020 Rocky Ridge Golf Course | Site design by David Burnett